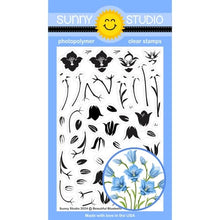
These beautiful spring stamps aren't just your average garden variety; they're a blooming masterpiece waiting to grace your projects. With clear layering technology, create a symphony of color that rivals the most vibrant flower gardens. It's like having a bouquet at your fingertips without worrying about watering!
Approximate Stamp Measurements:
Flower 1 (stem option 1)- 7/8"w x 1-7/8"h
Flower 1 (stem option 2)- 7/8"w x 1-5/8"h
Flower 1 (stem option 3)- 7/8"w x 2-1/4"h
Bluebell & Bud 2- 1-1/4"w x 1-1/8"h
Bluebell & Bud 3- 1-1/4"w x 1"h
Bud 4 & 5- 3/4"w x 1-1/8"h
Flower 6- 11/16"w x 1"h
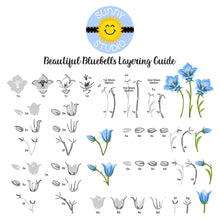
Please note: While this set is not particularly difficult to line up with a stamp positioning tool, it has many small pieces and may not be well suited for a novice stamper or for those who do not like detail work. Each blossom uses 4 coordinating colors of ink in four layers. Here at Purple Pinky Promises we take all the guesswork out of your ink pads. We sell Catherine Pooler Designs inks and her color wheel makes it SUPER SIMPLE! We sell all of the colors from this line of inks and the color wheel can be downloaded here. Once you download the color wheel, you’ll see the monochromatic colors that will perfectly match the need for 4 coordinating colors. If there aren’t 4 monochromatic colors, use one of the analogous colors (right next to the monochromatic colors). Here is the layering guide on a larger scale.
Here are Mendi’s helpful tips and tricks:
The guide shows the stamps starting with the lightest ink color, working towards the darkest, but sometimes I find it easier to start backward. They both work depending on what your preference is. The black outline indicates where that layer touches the previously stamped layer.
1. I stamped each layer twice in most cases to reduce blotchiness with some brands of ink, but then I had my heat gun set up next to me and would zap it with the heat gun immediately afterward to dry the ink on the spot so the stamp detail wouldn't disappear with the bleeding as the ink typically smooths and settles into the paper. I actually do this for all our layering stamps, but it was particularly helpful for this one.
2. For the little white dots on the three largest flowers, I went over them after I was done with a white gel pen to regain the brightness and crispness of those dots. This isn't a must, but I liked how it made them really pop. Those same dots really help with lining up the layers for that blossom.
3. I found it much easier to use my Copic marker to add the yellow stamen details than to mess with lining up that tiny stamp. I was able to quickly flick them on all at once with my pen in a fraction of the time rather than trying to line up the tiny stamp image.
4. I did not use the second layering option for my stems. I had already invested quite a bit of time on my giant pile of flowers and thought they looked awesome without it so that layer is optional.
5. The three flowers in the top right corner of the layering guide (shown above) use the same flower blossom and only have different stems so if you are careful in your planning, you can set up your flower in such a way that all you have to do is add different stems without switching out the flower layers.
6. I always set up my test layers in my stamp positioning tool using copy-weight scratch paper, stamping a half dozen of them to have on hand to help me set up each layer. When it came to positioning the stems to match my dies, I laid the die over the blossom portion and then traced the stem along the inside of the die onto my scratch paper. I could then line up the stem image to line up with my tracing so it would perfectly line up with the dies for each one. This trick worked beautifully!
Check out the coordinating Beautiful Bluebell Dies for additional design options.
- 4x6 Photopolymer Clear Stamp Set.
- For use with a clear acrylic block (not included).
- Lovingly made in the USA.


